![]()
I got my first 3D printer a couple of years ago. It was in inexpensive da Vinci Jr. This is a filament printer, which seemed to be the most commonly used. I printed a few diorama characters, a few windows, and a few locomotive parts. It did well with architectural and mechanical elements, not so well with characters. In fact, I was pretty disappointed with characters and pretty much gave up on that use of 3D printing.
I wondered all along if a resin printer would give me better quality. I had noticed that less expensive resin printers were becoming available. I finally decided to bite the bullet and dive in. I got an Egeloo Mars 2 Pro for $250 and some resin. Resin comes in 1000g bottles. I didn't know what a 1000g bottle looked like - couldn't they just tell me that's about a liter? They looked small in the picture so I ordered three. A little resin goes a long way - I've got enough resin to print a G scale army.
The first thing I printed was a diorama character because I was eager to see the difference. My number one goal in 3D printing in the first place was characters because it is hard to find the characters you really want in the pose you really want. I had already played around enough to see that software was readily available to create any character you want in any pose you want if you have the patience to work with the software (I'll work on that part). But the quality in the finished product was sorely lacking.
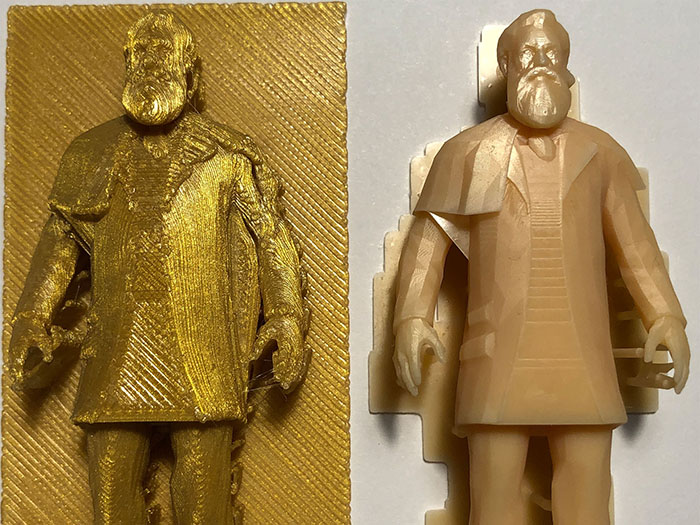
So how did my first character turn out? It blew me away. Going from filament to resin for characters is like going from dot matrix to laser printing on paper.
As you can probably guess, the character on the left was printed with the filament printer, and at its "best quality" setting. The character on the right was printed with the resin printer, and it only has one setting: Nothing but the best.
The good news is that resin printing quality is fantastic. Now here are the caveats.
I went with standard photopolymer resin. I saw a water washable resin was available but quite a bit more expensive. The standard resin needed to be washed in alcohol. I figured that should be no big deal. I didn't really understand what the washing was all about anyway. I found out right away. The printed item slowly emerges from a tank of liquid polymer. That means the finished item comes out dripping wet with uncured liquid polymer that needs to be washed off. You also need to wash off the print platform before it can be used again. So now I have a small sealable wash tub and jug of denatured alcohol nearby to wash everything off. The lower cost of standard resin did not take into account the added cost of alcohol and rubber gloves. The liquid polymer is said to readily absorb into your skin and even more so with alcohol involved, and both are toxic, so do wear gloves.
The other thing I figured out after the fact is that in addition to the printer, you need a post-curing station. You can get machines that are a combination wash and cure station, or just curing. The UV cure-only machines are less expensive - I ordered one for about $50. I already have my little alcohol tub. I will switch to water washable when my standard resin is used up, so I am less concerned with automatic washing. I don't know that I want to have a tiny washing machine filled with highly flammable liquid in the first place. Maybe the wash station is for water washable only - I didn't read the fine print.
The post-curing is said to be needed to add strength and stability to the printed item. I am not so concerned about strength for diorama characters. I was not sure what the stability part was about. One post I found said it is to make the surface look smooth and avoid any reactions because the resin can be highly toxic. A better explanation may be another post that says the purpose is to dry up and harden the outer surface because oxygen in the air diffuses into the outer layers of the resin while printing which prevents the print from fully curing. With the printer I have, the print is entirely submerged in liquid resin the entire time it is being printed, so I don't know how oxygen would get to it while printing. But whatever, I'll post-cure my prints. After printing a few characters, I have noticed that even though fully dried after washing, they are still a bit tacky. Post-curing eliminates that tackiness, so I guess there is something to the post-curing.
Ok, speaking of toxic, yes the resin is officially toxic. This doesn't mean you'll drop dead if you touch it. It is toxic to the same extent paint is toxic. Don't drink it. Don't eat it. And if you touch enough of it, you're going to get some serious skin irritation. I wear rubber gloves while washing my prints and the print platform. Goggles and mask are recommended, too.
Enough with the caveats, now back to having fun and what's good about resin printing.
As with the filament printer, you will need to go looking for STL files, or learn enough CAD software to create your own. The Make Human software is relatively easy to learn and can create quite a few different characters. You can also find a lot of pre-made free or inexpensive STL files online. Take a look at www.cults3d.com for example. At cults3d.com you can find quite a few free files as well as a lot of reasonably priced files. There is a wide selection at cgtrader.com but also a very wide range in prices. The cgtrader.com site even has printable old western buildings, but my printer isn't big enough for that. Just do a search for "STL files" and lots of stuff will come up. But be aware that several such sites are simply relisting the original sources such as cults3d.com.
To get ready to print, you need to run the STL file through the "slicing" software. This is what prepares it for the specific printer. The software recommended and available for free download for the Mars 2 Pro is Chitubox. It adds the supports and creates the slice data (CTB file) which you then copy to a USB flash drive. Insert the flash drive into the printer, and tell it to print. This slicing software is far nicer to work with than the slicing software for my first printer. A couple of nice things it does for you is tell you ahead of time how long the print will take, and also how much resin it will use. Resin use in turn translates into cost. I'm printing individual G scale figures for about $0.60 each according to the software, and between $3 and $4 for horse with rider.
One of the things the slicing software does is add supports for printing. It does this automatically, and most of the time does it well. I printed a set of goats and found they were all missing at least 2 of their legs. The slicing software had added only one support under each hoof, and apparently that wasn't enough. When I reprinted these, I manually added extra supports, and the software makes it very easy to do this. You just touch the mouse to the point on the piece where you want to add a support, then click, and it automatically draws in the complete support.
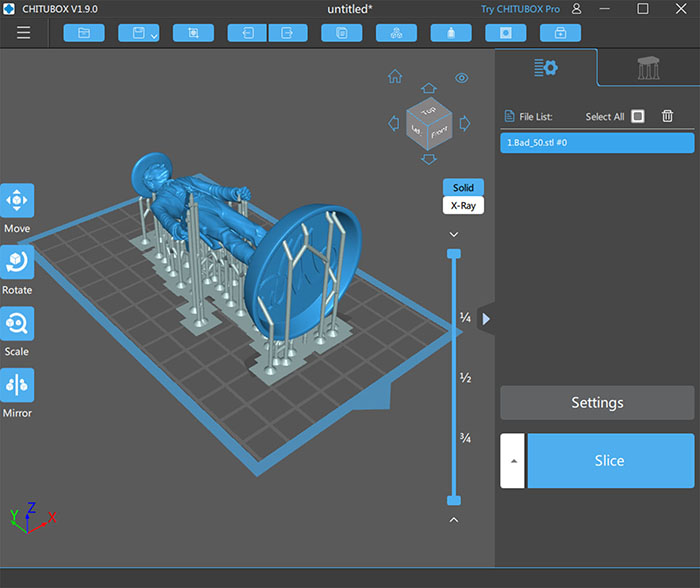
This is a screen shot of one of the cowboys after supports were added automatically by the slicing software. This character printed very nicely and the automatic supports were sufficient as they are most of the time. I did make one adjustment to the supports. The support contact area was originally 0.5mm, and on a couple of prints, the character pulled away from the supports prematurely and did not print correctly. I subsequently increased the support contact area to 1.0mm and didn't have separation problems after that.
After printing a few characters one at a time, each taking 1.5 to 3 hours, I learned how to place multiple characters in the same print batch. If all of the characters have their hands at their sides, I can print 4 characters at once. If arms are extended, that starts to occupy twice as much space. I print characters laying down since that cuts way down on print time at least for fewer characters. Printing characters standing up would take 3 to 4 times longer, but I could probably squeeze in 6 or 8 characters doing it that way. I haven't tried that yet. Other than print time, the other reason for printing characters laying down (and face up) is to keep all the supports on the back side.
When it comes to removing the supports and cleaning up the printed piece, you can just break off the supports if the printed piece is pretty solid. But when I printed the cowboy on a horse, the reins were thinner than some of the supports holding them up, so very careful cutting away of the supports was required. In spite of being careful, I still managed to break one of the reins. I as about to go searching for information on what sort of glue holds resin when another thought occurred to me. Why not just apply some uncured resin to the break and put it back in the curing station? The whole printing process is all about uncured resin being caused to stick to already cured resin by exposure to UV. Using that same process to glue a broken part should work, too, right? It worked quite nicely. Uncured resin makes good glue for resin parts - just cure in UV to make it set.
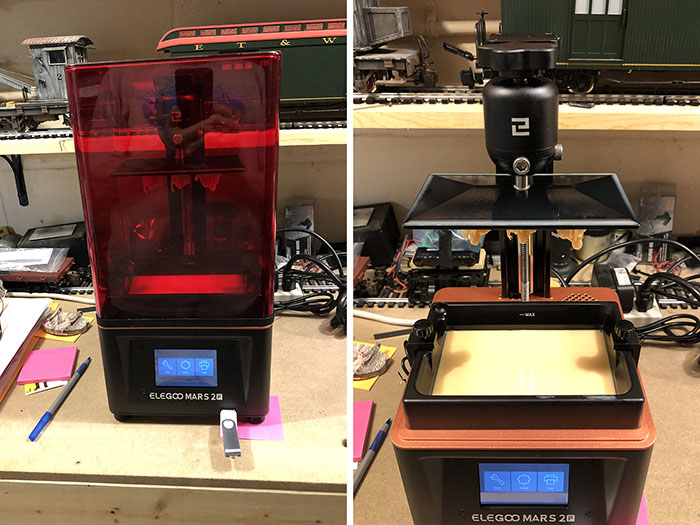
The printer is pictured with its cover in place on the left - the way it remains most of the time. On the right you can see a view of the resin tank. The print platform is in the fully raised position above the tank.
For comparison, this is how a filament printer works: The raw material is a spool of filament that looks very much like the line in a weed whip. This filament is run through a heated nozzle that looks and acts much like a hot glue gun. The flow of material is turned on and off by the computer. The X and Y axis movement are controlled much like a CNC machine while material is deposited on the print platform. After each layer is put down, the nozzle moves up (Z axis) a tiny bit and the next layer is started.
This is how a resin printer works: The raw material is a pool of liquid photopolymer. The polymer will harden when exposed to UV light. The bottom of the resin tank is clear. It sits on top of a high resolution LCD screen - pretty much the same sort of screen you are probably looking at now, or when you watch TV, just smaller. The resin printer is "black and white" because the only thing that matters is exposing the resin to light or not. When the slicing software "slices" your 3D image, what it is doing is creating a big collection of images that it will expose in sequence. At the very start, the print platform will go all the way to the bottom of the resin tank, the computer will put the first image on the screen, and turn on the UV light for a certain exposure time (typically 2.5 seconds on my printer). The print platform will then raise up a bit to allow fresh liquid to flow freely, then drop back toward the bottom of the resin tank. But each time it descends back into the tank, it drops down just slightly less than the last time, typically 0.05mm less. With each exposure, another 0.05mm layer of hardened polymer is added to whatever was already there. Slowly but surely, a solid 3D form starts to grow out of the liquid pool.
My 3D characters are typically about 3 inches high, but I print them laying down so that they print faster. Even so, the most compact character is usually around 800 "slices" or layers of 0.05mm polymer. Because each layer is formed by a single UV exposure through an LCD image, 3 or 4 characters can be printed just as quickly as one if you have room.
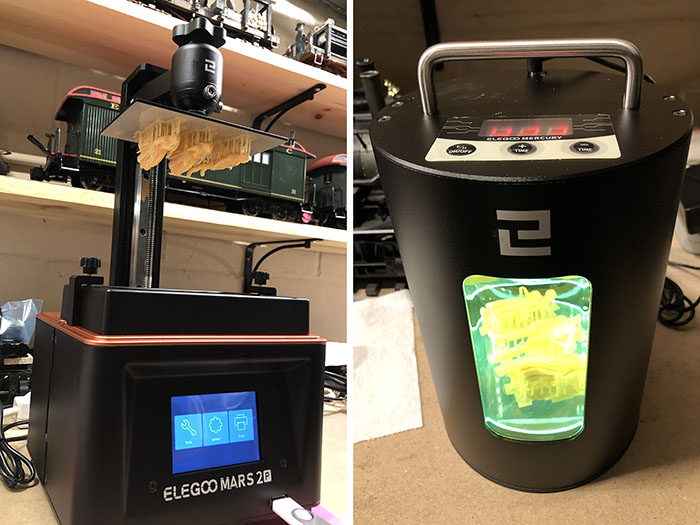
Here is another view of the print platform with a completed print of three characters. Compared to a filament printer, resin printers print the objects "upside down". The post-curing chamber is pictured on the right.
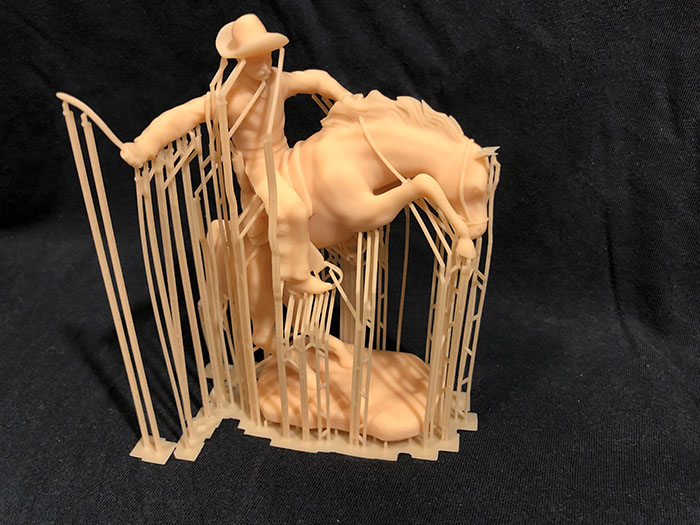
Here is my horse and rider after washing and drying. This one is just about the maximum size character I can print with my particular model printer. This one took over 8 hours.
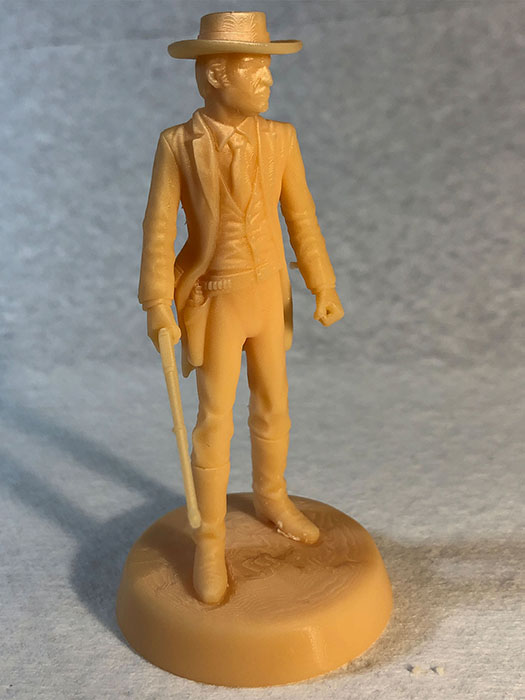
Another example of the great detail you can get out of a resin printer. This character is about 3" high, which for G scale, scales to a 6' tall cowboy. Actually, I think this is the marshal looking for a couple of bad guys. You can get resin in various colors. Since my top goal was good characters, I got beige colored resin so everything starts out in pretty close to natural flesh color. I only need to paint the clothing and dot the eyes.

This is most of the collection of pieces I printed with my first 1000g bottle of resin ($35). I got 30 people, 3 horses and 9 goats. I didn't need that many goats for one sod roof, but I was printing 3 at a time. The first run turned out to be baby goats because I didn't have the scaling figured out quite right. The next set got tossed because the supports didn't hold. I manually added supports for the final good run.
Resin printing is definitely messier, but I will make that sacrifice for the night and day difference in quality when printing diorama characters. I had always wanted to be able to print characters because sometimes you can't simply buy what you want. At first, I thought 3 liters of resin could last me a lifetime. It might only get me through the winter. I'm having too much fun!